
Spring MVC Basic Example Without Any XML Configuration.
- May 25, 2017
- 4 min read

In this article we are going to create simple hello world basic example step by step using Spring MVC and we will do all required configuration without XML i.e. using java classes.
Technologies in this article :
Maven 4.0.0
JDK 1.8
Spring 4.2.5.RELEASE
Spring MVC Architecture Flow :
The DispatcherServlet first receives the request.
The DispatcherServlet consults the HandlerMapping and invokes the Controller associated with the request.
The Controller process the request by calling the appropriate service methods and returns a ModeAndView object to the DispatcherServlet. The ModeAndView object contains the model data and the view name.
The DispatcherServlet sends the view name to a ViewResolver to find the actual View to invoke.
Now the DispatcherServlet will pass the model object to the View to render the result.
The View with the help of the model data will render the result back to the user.
1. Demo.
2. Create Maven Project And Add Required Dependencies.
File : pom.xml
<project xmlns="http://maven.apache.org/POM/4.0.0" xmlns:xsi="http://www.w3.org/2001/XMLSchema-instance" xsi:schemaLocation="http://maven.apache.org/POM/4.0.0 http://maven.apache.org/maven-v4_0_0.xsd"> <modelVersion>4.0.0</modelVersion> <groupId>org.com</groupId> <artifactId>spring_mvc_hello_world_example</artifactId> <packaging>war</packaging> <version>0.0.1-SNAPSHOT</version> <name>spring_mvc_hello_world_example Maven Webapp</name> <url>http://maven.apache.org</url> <properties> <junit>4.11</junit> <jstl>1.2</jstl> <javax.servlet>3.1.0</javax.servlet> <spring.version>4.2.5.RELEASE</spring.version> </properties> <dependencies>
<!-- JUNIT API --> <dependency> <groupId>junit</groupId> <artifactId>junit</artifactId> <version>${junit}</version> <scope>test</scope> </dependency> <!-- http://mvnrepository.com/artifact/jstl/jstl --> <dependency> <groupId>jstl</groupId> <artifactId>jstl</artifactId> <version>${jstl}</version> </dependency> <!-- Servlet API --> <!-- http://mvnrepository.com/artifact/javax.servlet/javax.servlet-api --> <dependency> <groupId>javax.servlet</groupId> <artifactId>javax.servlet-api</artifactId> <version>${javax.servlet}</version> <scope>provided</scope> </dependency> <!-- Spring dependencies --> <!-- http://mvnrepository.com/artifact/org.springframework/spring-core --> <dependency> <groupId>org.springframework</groupId> <artifactId>spring-core</artifactId> <version>${spring.version}</version> </dependency>
<!-- http://mvnrepository.com/artifact/org.springframework/spring-web --> <dependency> <groupId>org.springframework</groupId> <artifactId>spring-web</artifactId> <version>${spring.version}</version> </dependency> <!-- http://mvnrepository.com/artifact/org.springframework/spring-webmvc --> <dependency> <groupId>org.springframework</groupId> <artifactId>spring-webmvc</artifactId> <version>${spring.version}</version> </dependency> </dependencies> <build> <finalName>spring_mvc_hello_world_example</finalName> <plugins>
<plugin>
<groupId>org.apache.maven.plugins</groupId>
<artifactId>maven-war-plugin</artifactId>
<version>2.6</version>
<configuration>
<failOnMissingWebXml>false</failOnMissingWebXml>
</configuration>
</plugin>
<plugin> <groupId>org.apache.maven.plugins</groupId> <artifactId>maven-compiler-plugin</artifactId> <version>3.1</version> <configuration> <source>1.8</source> <target>1.8</target> </configuration> </plugin>
</plugins> </build> </project>
3. Create Class For Spring Configuration.
Create a class for spring configuration which is going to replace spring-servlet.xml file.
File : SpringContextInitializer.java
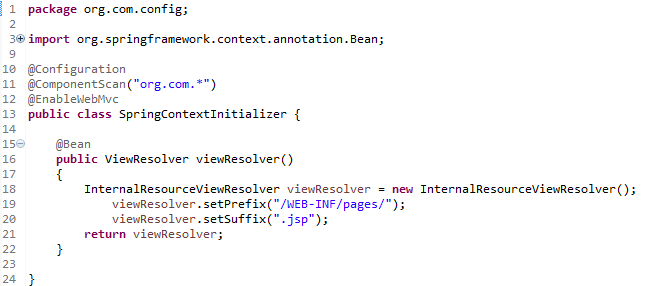
Annotate this class with following Annotations :
@Configuration = Indicates that a class declares one or more @Bean methods and may be processed by the Spring container to generate bean definitions and service requests for those beans at runtime.
@ComponentScan = Configures component scanning directives for use with @Configuration classes. Provides support parallel with Spring XML's <context:component-scan> element. Either basePackageClasses or basePackages (or its alias value) may be specified to define specific packages to scan. If specific packages are not defined, scanning will occur from the package of the class that declares this annotation.
@EnableWebMvc = Adding this annotation to an @Configuration class imports the Spring MVC configuration from WebMvcConfigurationSupport.
StartFragmentTo customize the imported configuration, implement the interface WebMvcConfigurer or more likely extend the empty method base class WebMvcConfigurerAdapter and override individual methods,EndFragment
@Bean = Indicates that a method produces a bean to be managed by the Spring container.
ViewResolver = In Spring MVC, view resolvers enable you to render models in a browser without tying you to a specific view technology like JSP, Velocity, XML…etc.
There are two interfaces that are important to the way Spring handles views are ViewResolver and View. The ViewResolver provides a mapping between view names and actual views. The View interface addresses the preparation of the request and hands the request over to one of the view technologies.
InternalResourceViewResolver = Convenient subclass of UrlBasedViewResolver that supports InternalResourceView (in effect, Servlets and JSPs) and subclasses such as JstlView and TilesView. You can specify the view class for all views generated by this resolver by using setViewClass(..).
4. Create Class For Web Configuration.
Create a class for web configuration which is going to replace web.xml file.
File : WebInitializer.java

For this implement your class with WebApplicationInitializer interface and implements it's method.
In this method first provide bean related information to spring container using AnnotationConfigWebApplicationContext class.
Now configure Dispatcher servlet as front controller using instance of AnnotationConfigWebApplicationContext class.
5. Create Controller Class.
File : StudentController.java
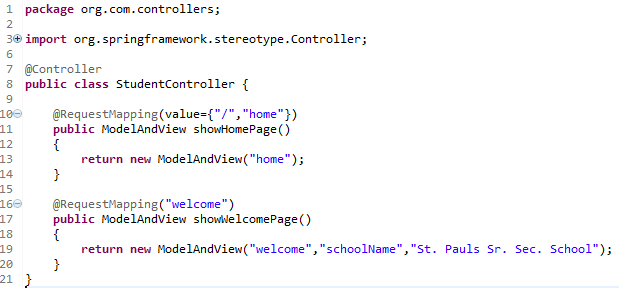
Annotate controller class with following annotations :
@Controller = Indicates that an annotated class is a "Controller" (e.g. a web controller).StartFragment
This annotation serves as a specialization of @Component, allowing for implementation classes to be autodetected through classpath scanning. It is typically used in combination with annotated handler methods based on the org.springframework.web.bind.annotation.RequestMapping annotation.
EndFragment
@RequestMapping = Annotation for mapping web requests onto specific handler classes and/or handler methods.
ModelAndView = Holder for both Model and View in the web MVC framework. Note that these are entirely distinct. This class merely holds both to make it possible for a controller to return both model and view in a single return value. Represents a model and view returned by a handler, to be resolved by a DispatcherServlet. The view can take the form of a String view name which will need to be resolved by a ViewResolver object; alternatively a View object can be specified directly. The model is a Map, allowing the use of multiple objects keyed by name.
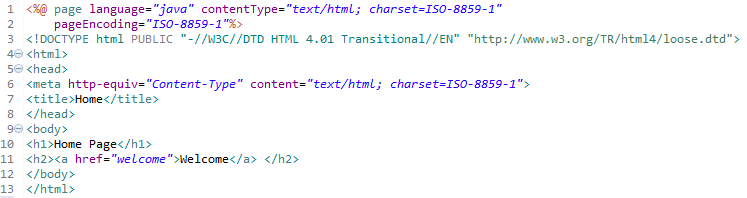
6. Create jsp Pages.
File : home.jsp
File : welcome.jsp
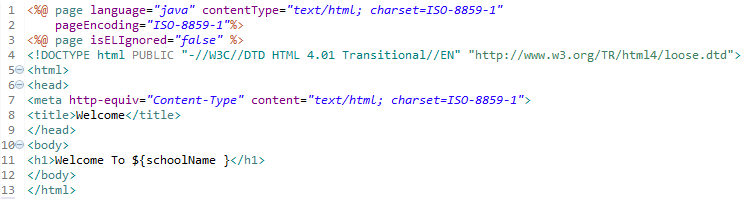
Note :
In welcome.jsp page we used EL syntax to render model object (schoolName) value on page.
Use <%@ page isELIgnored="false" %> sp that jsp page can rendered EL syntax.
7. Project Structure.

Find Source Code @GitHub.
In next post we will explain @PathVariable and @RequestParam in Details .
For updates of our next post please subscribe below and don't forget to like. In case of any queries write in comment section.


Comments